
Quickstart
This topic introduces how to quickly integrate the Android IAPASAP SDK to implement log reporting, data collection, and UI component rendering capabilities.
Before you begin
Ensure you are familiar with the following requirements:
- Operating system:
Your device must run Android 4.2 (API level 17) or later. For optimal performance, it is recommended to use devices with Android 6.0 (API level 23) or later. Set minSdkVersion in the build.gradle file to 23 or later.
- Software requirements:
- Android Studio must be installed on your computer.
- The Gradle plugin version must be 4.1 or later.
- Kotlin syntax support is required. If your application supports only Java, you must still enable Kotlin language support.
- It is recommended that you thoroughly test your super app's functionalities after integrating the Android IAPASAP SDK, as its third-party library dependencies might conflict with the version requirements of other SDKs or your super app. For more information, refer to Third-party library dependencies.
Getting started
To get started with the ASAP SDK, take the following steps:
Step 1: Obtain the ASAPLocalConfiguration.json file
Contact technical support to obtain the ASAPLocalConfiguration.json file.
Step 2: Add the configuration file
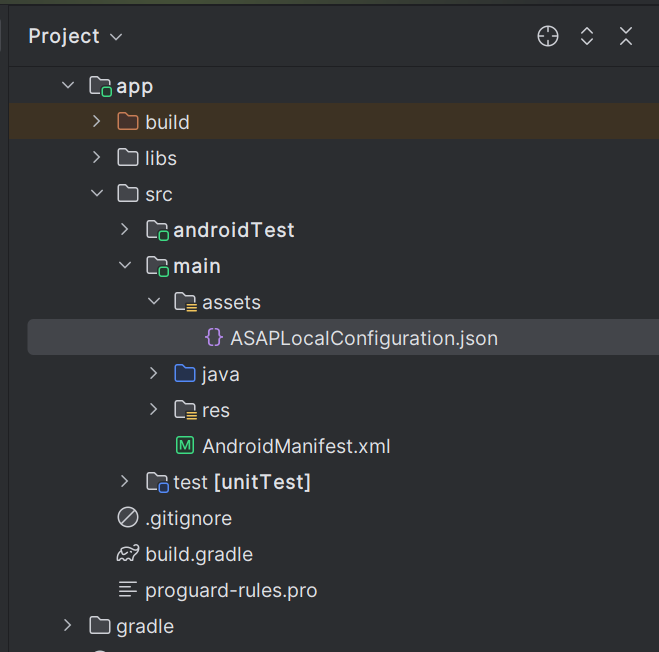
Add the ASAPLocalConfiguration.json file to the asset directory of your Android project.
Step 3: Add the Maven repository
Add the Maven repository to your root build.gradle file using the following code:
repositories {
    maven {
        url 'https://globaltech.alipay.com/api/v1/file/repository/minisdk/'
        credentials {
            username = USERNAME
            password = PASSWORD
        }
    }
}Note: The username and password values in the preceding code are desensitized. To obtain sample codes with actual values, see Credentials.
Step 4: Add dependencies
To add the required dependencies, follow these steps:
- Add the dependencies in the app-level build.gradle file with the following code:
// in app build.gradle
// if there are some conflicts with existing sdk, please exclude them
dependencies {
   implementation "com.alipay.plus.android.asap:asap:${asap_version}"
}- Externalize the version number in the build.gradle file to facilitate managing upgrades using the following code:
seext {
     asap_version = 'ASAP_VERSION'
}
Replace the value of ASAP_VERSION with the latest version number.
- Add the configuration in the project-level gradle.properties file using the following code:
android.enableResourceOptimizations=falseStep 5: Add Proguard configuration
Add the following configuration to your Android project to prevent the SDK code in the SDK from being obfuscated:
-keep class com.iap.ac.** { *; }
-dontwarn  com.iap.ac.**
-keep class com.alipay.** { *; }
-dontwarn com.alipay.**
-keep class com.alibaba.** { *; }
-dontwarn com.alibaba.**
Step 6: Add predefined widget template
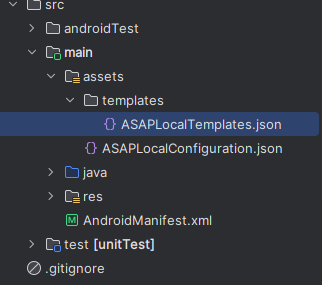
Add an ASAPLocalTemplates.json file to the assets directory of your Android project and include the file path in the initialization configuration to render the UI components for the Widget module.
Step 7: Initialize the SDK
After adding dependencies, initialize the SDK within your application's onCreate event using the following codes:
Note: If you also integrate the IAPMiniProgram SDK, ensure that you complete its initialization before initializing the Android IAPASAP SDK.
Kotlin
class YourApplication : Application() {

    override fun onCreate() {
        super.onCreate()
        val config = Configuration.Builder()
                      //Configure SPI for obtaining user ID
            .setFetchUserId(object : IFetchUserId {
                override fun fetchUserId(business: Business): String {
                    return "your user id"
                }
            })
            .setDebug(true)
                        //Configure settings for ASAPBusiness
            .setASAPConfiguration(
                ASAPConfiguration(
                    "https://xxx",
                    "https://xxx",
                    "templates/ASAPLocalTemplates.json"
                )
            )
                        //Configure signature mode for network request
            .setRpcSingerMode(RPCSignerMode.Helper(appKey, authCode))
            .build()
        ComponentManager.init(this, config, object : IntiCallBack {

            override fun onSuccess() {

            }

            override fun onFailure(code: Int, msg: String, throwable: Throwable?) {

            }
        }
    }
}
Java
public class YourApplication extends Application {
    @Override
    public void onCreate() {
        super.onCreate();
        Configuration config = new Configuration.Builder()
                //Configure SPI for obtaining user ID
                .setFetchUserId(new IFetchUserId() {
                    @Override
                    public String fetchUserId(@NonNull Business business) {
                        return "your user id";
                    }
                })
                .setDebug(true)
                //Configure settings for ASAPBusiness
                .setASAPConfiguration(new ASAPConfiguration("https://xxx", "https://xxx", "templates/ASAPLocalTemplates.json"))
                //Configure signature mode for network request
                .setRpcSingerMode(new RPCSignerMode.Helper.Helper(appKey, authCode))
                .build();
        ComponentManager.Companion.init(this, config, new IntiCallBack() {

            @Override
            public void onSuccess() {

            }

            @Override
            public void onFailure(int i, @NonNull String s, @Nullable Throwable throwable) {

            }
        });
    }
}
Step 8: Implement basic capabilities
To enable log reporting, quick data collection, and UI component rendering, call the following APIs as needed:
- init(): Initialize SDK.
- click(): Collect click event data.
- exposure(): Collect exposure event data.
- error(): Collect error event data.
- pageStart()/pageEnd(): Collect start and end of page event data.
- ASAPBusiness.pullSpaceContent(): Obtain a single data entry.
- ASAPBusiness.pullSpaceContents(): Obtain multiple data entries.
- ASAPBusiness.renderWidget(): Render a view using data from either ASASBusiness.pullSpaceContent or ASASBusiness.pullSpaceContents.
- widget.renderWidget(): Render a view with specified data.
Next steps
The preceding steps guide you through the integration of the IAPASAP SDK and implementation of its basic capabilities. To explore more advanced capabilities of the IAPASAP SDK, refer to the following chapters.
- fetchUserId: Implement user ID collection and call the ASASBusiness.pullSpaceContent or ASASBusiness.pullSpaceContents APIs via the collected user ID to obtain space content.
- ASAPConfiguration: Configure the URL of the ASAPBusiness module, the URL for uploading log information, and the local file path for the predefined template.
- RPCSignerMode: Configure the signature mode for wireless security network requests.
- Integrate IAPASAP-Miniprogram: If you want your super app to support log reporting and data collection for its mini programs, integrate the IAPASAP-MiniProgram SDK which provides mini program JSAPIs and H5 (mobile webpage) JSAPIs. However, to use them, you must integrate the IAPMiniProgram SDK first. Refer to the IAPMiniProgram for usage guidance.
- Customize the component: Customize the components for image loading, console log output, and so on.
References
Credentials
repositories {
  maven {
    url 'https://globaltech.alipay.com/api/v1/file/repository/minisdk/'
    credentials {
      username = "iapsdkdownload@gmail.com"
      password = "1Download"
    }
  }
}