
Quickstart
This topic introduces how to quickly integrate the iOS IAPASAP SDK to implement log reporting, data collection, and UI component rendering capabilities.
Before you begin
Ensure you are familiar with the following requirements:
- To run min-programs, ensure iOS 11 or later is installed on your device.
- Xcode 14.0 or later must be installed on your computer.
- CocoaPods 1.10.0 or later must be installed on your computer. Refer to the Official installation guide for installation.
- It is recommended that you thoroughly test your super app's functionalities after integrating the iOS IAPASAP SDK, as its third-party library dependencies might conflict with other SDKs or your super app. For more information, refer to Third-party library dependencies.
Getting started
To get started with the ASAP SDK, take the following steps:
Step 1: Obtain the ASAPLocalConfiguration.json file
Obtain the ASAPLocalConfiguration.json file. Any problems, contact the technical support.
Step 2: Add the configuration file
Move the ASAPLocalFileConfiguration file into the root of your Xcode project. When prompted by a dialog box, select the checkboxes to add the file to all targets, such as IAPASAPDemo, as shown in the following screenshot.
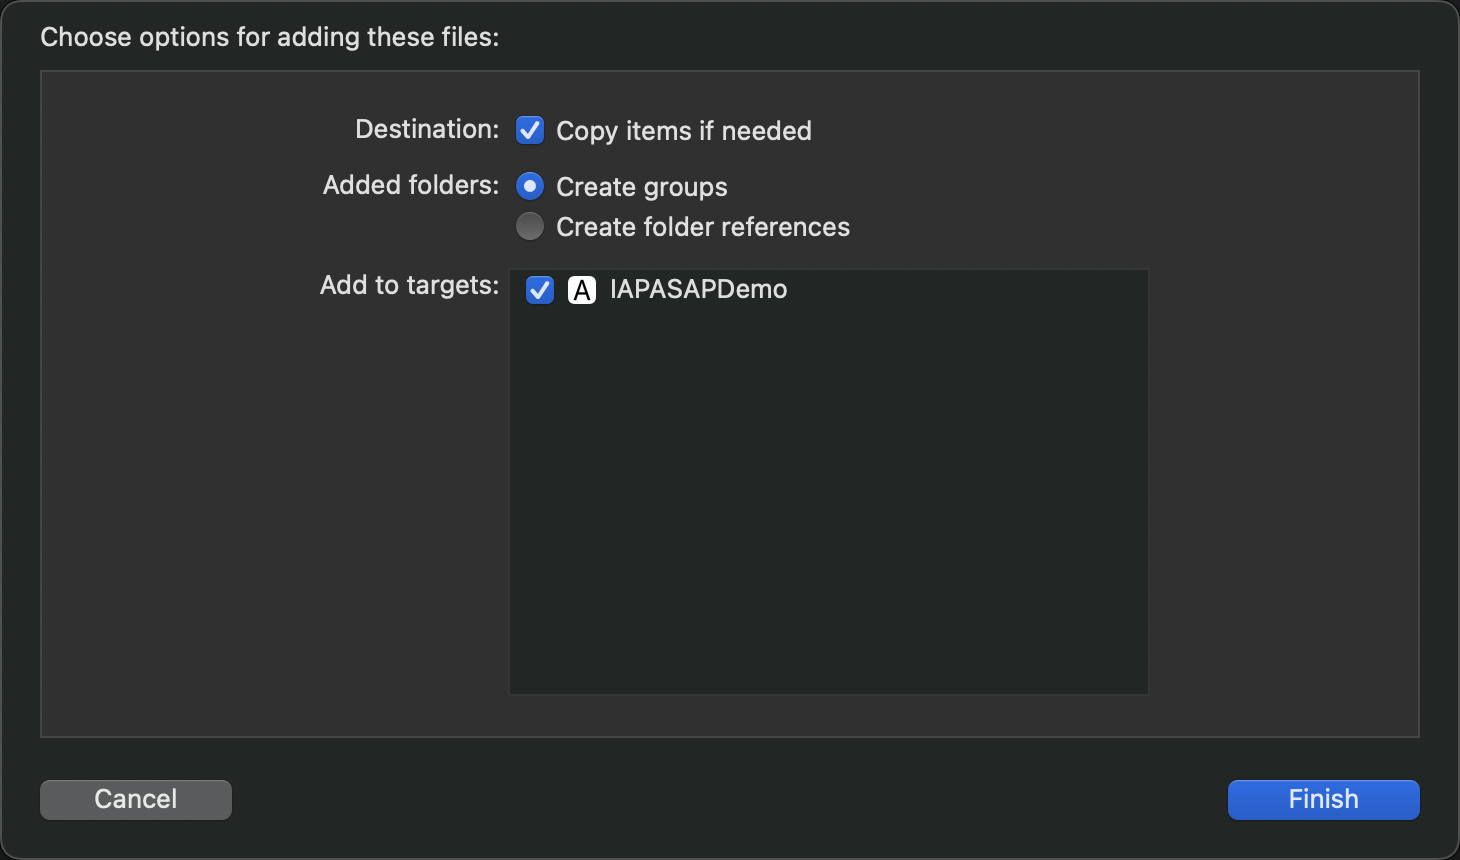
To confirm that the configuration file is added to all intended targets, select the file in Xcode, and the Target Membership box shows the selected targets.
Step 3: Update your .netrc file
For security reasons, Mini Program Platform uses a private CocoaPods source to distribute the pods. To gain access to the private source, you need to update your .netrc file which holds the required credentials. For more information about the .netrc file, see The .netrc file.
To update your .netrc file, take the following steps:1.Copy the configuration below to your .netrc file. The .netrc file is located in your $HOME directory. If you don't have a $HOME directory, create one.
machine globaltech.alipay.com
login YOUR_ACCOUNT
password YOUR_PASSWORDNote: The values of YOUR_ACCOUNT and YOUR_PASSWORD in the preceding code are desensitized. To obtain sample codes with actual values, see Credentials.
- Add the private source and dependency to your Podfile using the following code:
source 'https://globaltech.alipay.com/api/v1/file/common/2017062215370883/minisdk'

target 'YOUR_TARGET' do

  pod 'IAPASAP'

end
Step 4: Add predefined widget template
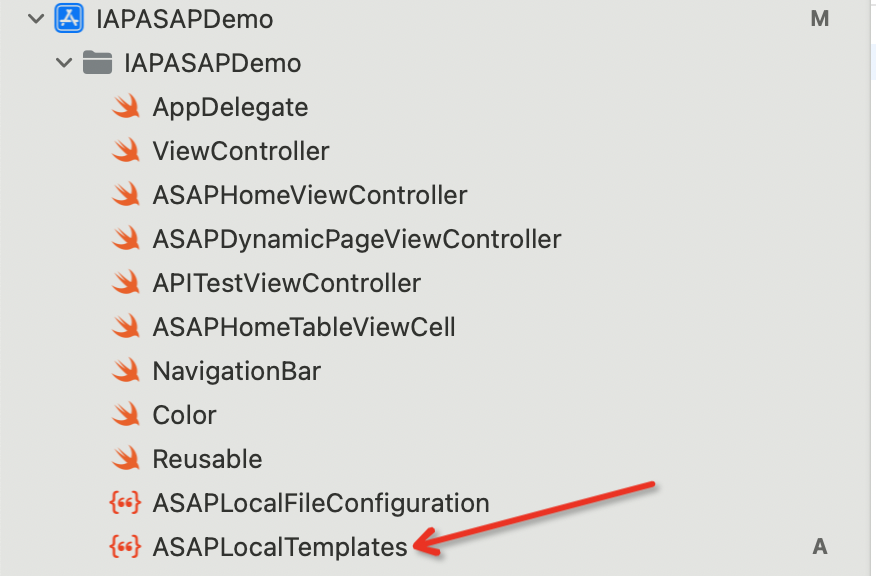
Add an ASAPLocalTemplates.json file to the root of your Xcode project and include the file path in the initialization configuration to dynamically render the UI component for the Widget module.
Step 5: Manage project dependencies
The IAPASAP SDK supports integration via CocoaPods, which offers a streamlined dependency management system that helps prevent errors that may occur due to manual imports. To manage project dependencies, take the following steps:
- Set up the CocoaPods environment.
sudo gem install cocoapods
pod setup- Create a Podfile in the root directory of your Xcode project and add the dependency for iOS IAPASAP SDK in the Podfile.
If you want your super app to support log reporting and data collection for its mini programs, you also need to integrate the IAPMiniProgram SDK and add IAPASAP/MiniProgram to the Podfile. If you do not need this functionality, simply add IAPASAP to your Podfile.
source 'https://globaltech.alipay.com/api/v1/file/common/2017062215370883/minisdk'

target 'YOUR_TARGET' do

  pod 'IAPASAP'
  pod 'IAPASAP/MiniProgram'

end- Install or update dependencies
To install the SDK, run the pod install or pod install --repo-update command in the directory where your Podfile is located. If you encounter any issues, refer to Troubleshooting CocoaPods CDN Source for assistance.
- Open project
After runningpod update or pod install , navigate to the project directory and locate the xxx.xcworkspace file to open your project.
Step 6: Initialize the SDK
To initialize the SDK, refer to the following code:
Note: If you also integrate the IAPMiniProgram SDK, ensure that you complete its initialization before initializing the iOS IAPASAP SDK.
import UIKit
import ASAPCore

func application(_ application: UIApplication,
                 didFinishLaunchingWithOptions launchOptions: [UIApplication.LaunchOptionsKey: Any]?) -> Bool {

    var configuration = Configuration()
    // Configure SPI for obtaining user ID
    configuration.fetchUserId = { _ in "ASAPTestUserId" }
    // Configure signature mode for network request
    configuration.rpcSingerMode = .helper(key: "rpcSingerModeHelperKey", authCode: "rpcSingerModeHelperAuthCode")
    // Configure settings for ASAPBusiness
    var asapConfiguration = Configuration.ASAPConfiguration()
    asapConfiguration.presetWidgetTemplateFilePath = Bundle.main.path(forResource: "ASAPBusinessWidgetTemplates", ofType: "json")
    configuration.ASAP = asapConfiguration

    do {
        try ComponentManager.configure(configuration: configuration)
    } catch let error as ASAPError {
        switch error {
            case .localConfigurationFileNotFound:
            print("Error Code: \(error.code), Description: \(error.debugDescription)")
            case .noSpecificBusinessTypesAvailable(business: let business):
            print("Error Code: \(error.code), Description: \(error.debugDescription), Business: \(business)")
            case .systemError(_):
            print("Error Code: \(error.code), Description: \(error.debugDescription)")
        }
    } catch {
        print("Unknown error: \(error)")
    }
}Note: It is recommended to insert the code to the
application(_:didFinishLaunchingWithOptions:)and run it on the main thread.
Step 7: Implement SDK basic capabilities
To open a mini program in your app, call either of the following APIs:
- init: Configure ASAP.
Obtain the ASAP list
To obtain the ASAP list in your app, call any of the following APIs as needed:
- click(): Collect click event data.
- exposure(): Collect exposure event data.
- error(): Collect error event data.
- pageStart/pageEnd(): Collect start and end of page event data.
- ASAPBusiness.pullSpaceContent(): Obtain a single data entry.
- ASAPBusiness.pullSpaceContents(): Obtain multiple data entries.
- ASAPBusiness.renderWidget(): Render a view using data from either ASAPBusiness.pullSpaceContent or ASAPBusiness.pullSpaceContents.
- widget.renderWidget(): Render a view with specified data.
Next steps
The preceding steps guide you through the integration of the IOS IAPASAP SDK and the implementation of its basic capabilities. To explore the more advanced capabilities of the SDK, refer to the following chapters.
- fetchUserId: Implement user ID collection and call the ASASBusiness.pullSpaceContent or ASASBusiness.pullSpaceContents APIs via the collected user ID to obtain space content.
- ASAPConfiguration: Configure the URL of the ASAPBusiness module, the URL for uploading log information, and the local file path for the predefined template.
- RPCSignerMode: Configure the signature mode for the wireless security network request.
- Integrate IAPASAP-Miniprogram: If you want your super app to support log reporting and data collection for its mini programs, integrate the IAPASAP-MiniProgram SDK which provides mini program JSAPIs and H5 (mobile webpage) JSAPIs. However, to use them, you must integrate the IAPMiniProgram SDK first. Please refer to the IAPMiniProgram for usage guidance.
Reference
Credentials
machine globaltech.alipay.com login iapsdkdownload@gmail.com password 1Download