Cashier Payment
If a merchant releases their mini program to an Alipay+ partner app located in a different country and requires payment services, they must provide cross-border transaction capability. To provide such capability, the merchant must implement either of Alipay+'s payment solutions: Cashier Payment or Auto Debit Payment.
This topic explains Cashier Payment, including its definition, user experience, prerequisites, workflow, and implementation resources.
Note: If you release your mini program to AlipayCN, to implement Cashier Payment for cross-border transactions, refer to the AlipayCN Cashier Payment solution.
What is Cashier Payment
Cashier Payment is a payment solution that enables merchants to accept payments worldwide within their mini programs. Within a mini program released to a super app in a different country, when a user checks out, they can select the super app (an e-wallet) as a payment method on the merchant's cashier page.
User experience
The user experience with Cashier Payment is described as follows:
- The user places an order within a mini program and selects the super app as the payment method on the merchant's cashier page.
- The user clicks the pay button and is then redirected to the payment confirmation page of the super app to complete the payment.
- The user confirms the payment result in the super app and returns to the mini program.
Before you start
To implement the Cashier Payment solution, the merchant must choose either Antom or one of the Alipay+ acquiring service providers as their acquiring partner. For a full list of Alipay+ acquiring service providers, refer to Alipay+ Acquiring Service Providers.
Procedure
The following diagrams walk you through how to obtain Cashier Payment capability.
Sequence
The following sequence diagram illustrates how Cashier Payment works:

The steps in the diagram are described as follows:
Step 1: Create order
- The user confirms the order and proceeds to checkout within a mini program (step 1).
- The mini program's frontend invokes the my.getSiteInfo JASPI and gets the super app information from the super app (steps 1.1-1.2). This information serves two purposes:
- To identify the required JSAPI to initiate the payment process. In this case, the returned siteName can be any value other than
ALIPAY_CN, indicating the required JSAPI is my.tradePay. - To request the acquirer to create an order because they might need this information in their API payload.
- The mini program's frontend calls its backend API to create an order, potentially including the obtained super app information. (step 1.3).
- The mini program's backend sends the order creation request to the acquirer and gets the corresponding payment information (steps 1.4.1-1.4.1.3). Note: For technical specifics on this step, consult the merchant's acquiring partner.
- The mini program's backend sends the payment information to the frontend (step 1.5)
- The mini program's frontend invokes the my.tradePay JSAPI with the payment information, and then the super app displays the cashier page.
Step 2: Pay bill
- The user checks the payment information on the cashier page and confirms the payment (step 2).
- The super app confirms the user's payment intention, and notifies the acquirer (steps 2.1.1-2.1.2)
- The super app sends its processing result to the mini program via the callback of the my.tradePay JSAPI (step 2.2).
- Based on the callback, the mini program can retry the payment or directly display the processing result to the user. For more information about the callback, refer to the result codes of my.tradePay (step 2.3).
Step 3: Update payment result
- The acquirer receives the payment result (step 3).
- The mini program's backend receives the payment result (step 3.1). The method for obtaining the result might vary based on the acquirer's technical solution. Usually, the mini program receives the result in the following ways:
- The acquirer actively sends the payment result to the mini program's backend.
- The mini program's backend continuously queries the payment result until it receives a final payment status.
For technical specifics on this step, consult the merchant's acquiring partner.
- The mini program's frontend gets the payment result and updates the page to display it to the user.
Workflow
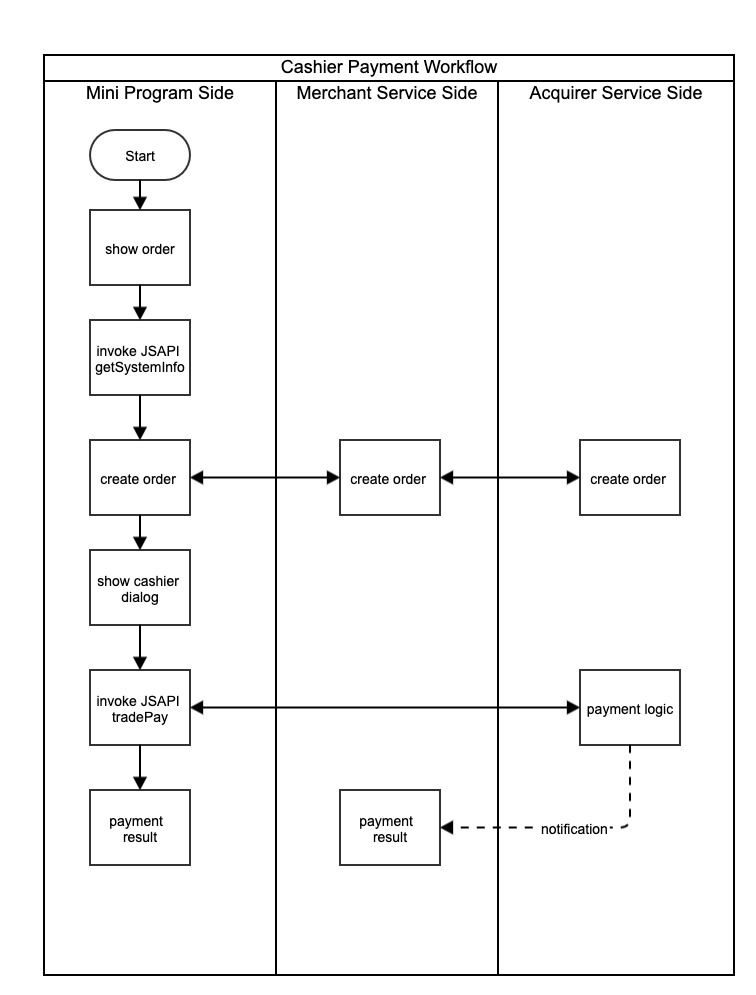
The diagram below shows the workflow of Cashier Payment:

The steps in the diagram are described as follows:
- A user starts to place an order in the mini program. The mini program invokes the my.getSiteInfo JSAPI to obtain the information about the system.
- As the order is created, the merchant server submits the payment request to the acquiring partner. The acquiring partner verifies the payment request and returns payment parameters to the mini program.
- On the user's mobile, the merchant's mini program shows the cashier dialog. Then the mini program calls the my.tradePay JSAPI to evoke the cashier inside the mini program for the user to confirm the payment and complete the transaction.
- As the payment is confirmed, the acquiring partner obtains the payment logic.
- After the user makes the payment, the payment result is returned. And the acquiring partner will notify the merchant of the payment result.
- The user has completed the payment on the mini program.
Sample code
The following sample code shows the calling of the my.tradePay JSAPI to initiate a Cashier Payment request:
my.tradePay({
  paymentUrl: '',
  success: (res) => {
    my.alert({
    content: JSON.stringify(res),
  });
  },
  fail: (res) => {
    my.alert({
    content: JSON.stringify(res),
  });
  }
});
API list
The following table lists the JSAPIs that mini programs must integrate to implement Cashier Payment:
API name | Description |
Obtains the site information. | |
Starts a payment transaction. |