Message sending
With this solution, merchants can learn how mini programs send messages to end users via Alipay+ International Mini Program Development Platform (AIMPDP), for example, inbox messages.
Note: This solution is aimed at mini programs that are released to AlipayCN (Alipay China).
How it works
The diagram below illustrates how merchant mini programs send messages to super app users:

The detailed flow is as below:
- Super app administrator creates message template:
- The super app administrator creates a template and configures the message variables on AIMPDP, such as order number and store name.
- Merchant applies for template:
- The merchant applies for the template and submits a request for approval.
- Once the request is approved, AIMPDP generates a template code for the merchant.
- Merchant integrates message sending API:
- The merchant sends the message sending request to AIMPDP using the template code and variable names as part of the request.
- AIMPDP receives the request and transfers the request to the corresponding super app server.
- Super app receives request and sends message to user:
- The super app server receives the message sending request from AIMPDP.
- The super app server sends the message to the user via the corresponding channel, such as Inbox - eWallet.
Before you start
Before you integrate with the message sending capability, make sure you have completed all the following steps:
- Apply for an account.
- Log in to the Alipay Global Merchant portal and click Manage to navigate to AIMPDP to manage mini programs.
- Create a mini program.
- Configure your merchant public key and obtain the platform public key. These two public keys are required when calling an openAPI. For detailed steps, see Configure signature keys.
Note: For more information about openAPI signature, see OpenAPIs Overview and Call an API via adding a signature.
- Add the message sending feature. For detailed steps, see Add features.
- Follow the guidelines to authorize AIMPDP to call AlipayCN's APIs on behalf of the merchant. This step is required in user authorization because the merchant needs to call the OpenAPIs in the user authorization feature provided by AIMPDP, and AIMPDP will forward the requests to AlipayCN.
- Contact your solution architect for permission to call the my.getSiteInfo and my.getAuthCode JSAPIs.
Procedures
To integrate the message sending capability, there are four steps you can expect:
Step 1: Get template code
You need to get the template code by applying for templates in AIMPDP. Before you start, ensure that you complete the following tasks:
- Start the release process of your mini program. For more information, see Step 1: New version created in Release mini programs.
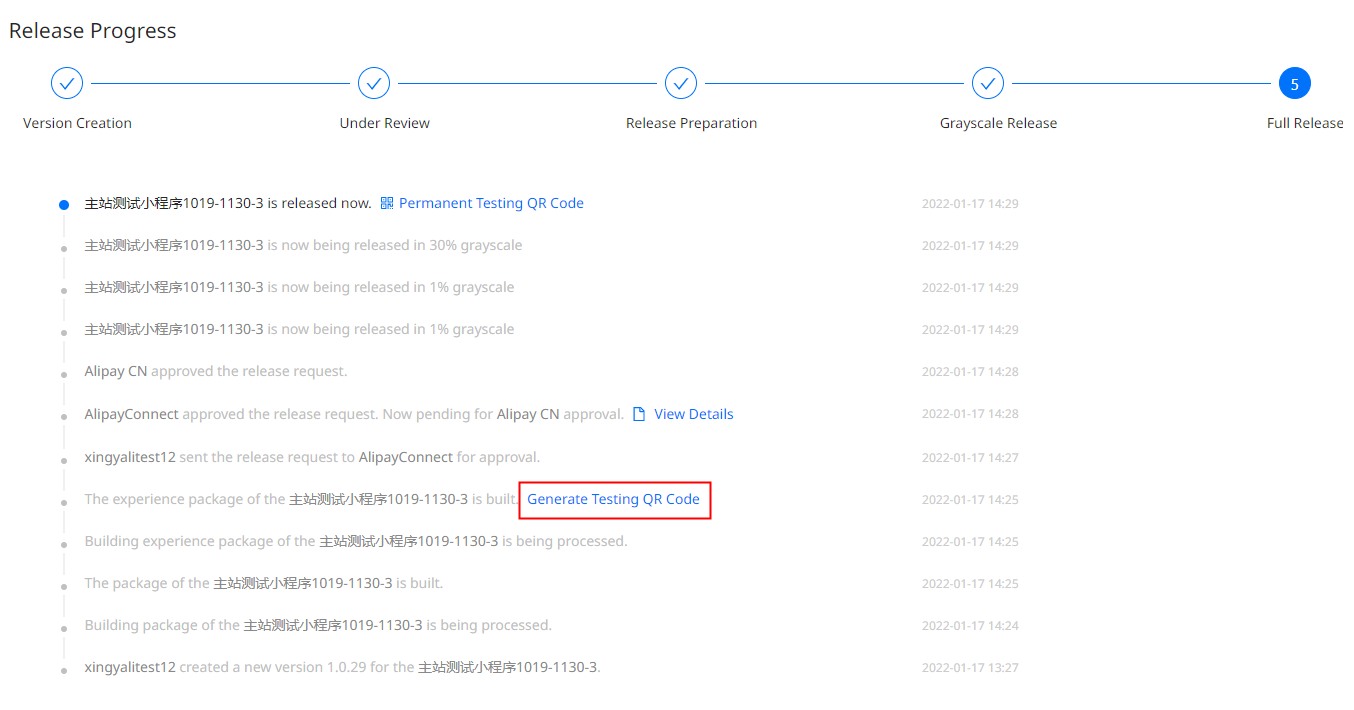
- On the release process page, click Generate Testing QR Code. Once the QR code is generated, the text becomes Experience QR Code.

Then complete the following steps to get the template code:
- Log into AIMPDP and click Operation.
- Select the mini program and the target app (which is AlipayCN in this case), then click Confirm.
- On the left navigation bar, go to Operation > Notification Delivery > Template Library. This is where you can view and apply for templates.
- Click Apply for Templates. Select a mini program, select a template, describe the scenario to use the template, then submit the request for approval.
- Once approved, you can view the template under Template Library. Here you can get the template code, named Customized Template ID on the platform.
Step 2: Obtain user authorization and subscribe message
2.1. Obtain authCode from super app
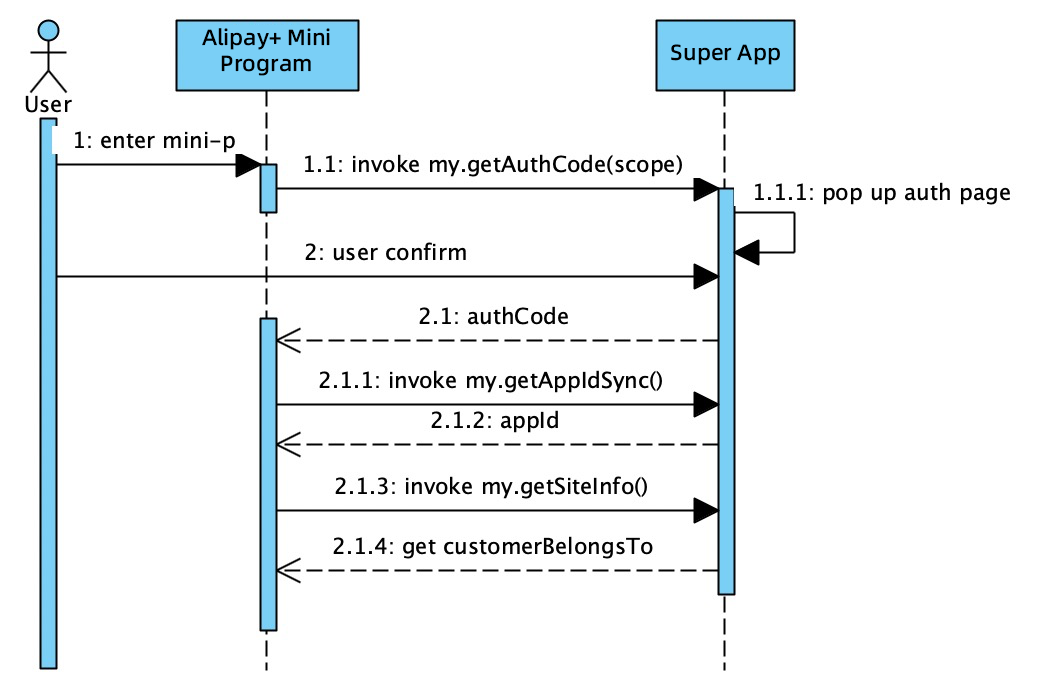
The sequence diagram below illustrates how a merchant's mini program obtains authCode from the super app:

The detailed steps are as follows:
- A user opens a merchant's mini program. The mini program invokes my.getAuthCode(scopes) to send an authorization request to the super app and will fetch authCode in the success callback. (Step 1.1)
Note: We recommend you call my.getAuthCode(scopes) with auth_user.
- The super app processes the request and displays an authorization page to the user. (Step 1.1.1)
- After the user confirms the authorization, choose one of the following to get authCode:
- The merchant server invokes the applyToken API with authCode and the API call returns only userId. When invoking the inquiryUserInfo API, the API call will return specific user information.
- The merchant server invokes the applyTokenAndInquiryUserInfo API to get an access token and obtain user information with one API call.
- Then the mini program calls the my.getAppIdSync JSAPI and gets appId from the super app. (Step 2.1.2)
- The mini program calls the my.getSiteInfo JSAPI and gets customerBelongsTo from the super app.
(Step 2.1.4)
Note: We recommend you not to call my.getAuthCode(scopes) with auth_base. auth_base indicates silent authorization, which means the super app will not display an authorization page to the user. The merchant server invokes the applyToken API with authCode and the API call returns only userId. When invoking the inquiryUserInfo API, the API call will get a response error with
INVALID_ACCESS_TOKEN.
2.2. Integrate message subscription component
The following sections guide you on how to integrate the message subscription component into your HTML5 or DSL mini programs:
2.2.1 HTML 5 mini programs
For your HTML5 mini program, follow the guide to import the JS files into your project and integrate the message subscription component.
Step 2 in the above guide demonstrates the instantiation of the subscription component codes. In this step, pass in the callback method and preset logic according to different subscription types (AGREE or REJECT).
When you need to display the subscription authorization panel, call the subscribeMsg.requestSubscribeMessage() method to request to display the panel. The preset logic in the callback method is then automatically executed after the user takes action.
Note: You can act accordingly based on the
callbackresult. Note that if the value of success istrueand the value of type isAGREE, it means the user agrees to subscribe.
2.2.2 DSL mini programs
For your DSL mini program, follow the guide to import the JS files into your project and integrate the message subscription component.
Step 2 in the above guide demonstrates the configuration to call the subscription component and change the panel status specified by the requestSubscribeMessage attribute. In this step, pass in the onCallback method and preset logic according to different subscription types (AGREE or REJECT).
When you need to display the subscription authorization panel, set the value of the requestSubscribeMessage attribute as true. The preset logic in the onCallback method is then automatically executed after the user takes action.
Note: You can act accordingly based on the
onCallbackresult. Note that if the value of success istrueand the value of type isAGREE, it means the user agrees to subscribe. To close the subscription authorization panel, set the value of the requestSubscribeMessage attribute asfalse.
Step 3: Obtain user authorization
For detailed steps to obtain user authorization, see User authorization. Then you will get a new accessToken. You can use accessToken for the message sending API call.
Note: This step is the normal step for obtaining user authorization, different from the my.getAuthCode JSAPI call mentioned in Step 2.1.
- The objective of Step 2.1 is to obtain user information.
- The objective of this step is to send messages to the user according to the user information you obtained. Therefore, authCode obtained from Step 2.1 cannot be reused in this step. That means you need to call the my.getAuthCode JSAPI again to get a new accessToken for message sending.
Step 4: Integrate message sending
The diagram below illustrates the overall sequence to integrate the message sending capability:

The detailed steps are as below:
- The user agrees to authorize the mini program to send event messages (i.e. system notification) in the super app (AlipayCN). (Step 1-12)
- For example, the user places an order in the mini program. When the order is ready, the merchant server or ISV calls
/v2/miniprogram/message/sendto send the request to AIMPDP, with templateCode and templateParams as well as accessToken obtained in Step 3. (Step 13-14) - AIMPDP gets userId by accessToken from the super app server. (Step 15-16)
- AIMPDP replaces the placeholders in the message template to get the final message content. Then the platform sends the message by userId to the super app server. (Step 17-18)
- The super app server sends the message to the user via the requested message channel, such as Inbox - eWallet, and returns the result. (Step 19-21)
/v2/miniprogram/message/send
For mini programs released to AlipayCN, call this API to send inbox event messages to AlipayCN users. In this scenario, authClientId is not required.
API | Direction | Description |
Merchant --> AIMPDP | A merchant calls this API to send a service notification (event message) to users via AIMPDP, such as payment result, order status, and so on. |
Sample request
Check below the sample request to send a message:
{
    "appId": "P000000000000001****",
    "accessToken": "2019112719074101000700000077771****",
    "customerBelongsTo": "ALIPAY_CN",
    "requestId": "20191127190741010007013213123****",
    "templateCode": "202109305800000001****",
    "templates": [
        {
            "templateParameters": {
                "orderNo": "123456",
                "storeName": "Yummy Chicken Rice",
                "miniBodyUrl": "pages%2Findex%2Findex&query=storeId%3D8888",
                "miniFooterUrl": "pages%2Findex%2Findex&query=storeId%3D8888"
            },
            "language": "zh-CN"
        }
    ]
}
Sample response
Check below the sample response for the message sending request:
{
    "appId": "P000000000000001****",
    "accessToken": "2019112719074101000700000077771****",
    "customerBelongsTo": "ALIPAY_CN",
    "requestId": "20191127190741010007013213123****",
    "templateCode": "202109305800000001****",
    "templates": [
        {
            "templateParameters": {
                "orderNo": "123456",
                "storeName": "Yummy Chicken Rice",
                "miniBodyUrl": "pages%2Findex%2Findex&query=storeId%3D8888",
                "miniFooterUrl": "pages%2Findex%2Findex&query=storeId%3D8888"
            },
            "language": "zh-CN"
        }
    ]
}
API list
Refer to the following two tables for the APIs that are used in the above procedures:
JSAPI
API name | Description |
Obtains the site information. | |
Obtains the authorization code. | |
Obtains the mini program ID. |
OpenAPI
API name | Description |
Obtains an access token and inquires about user information in the super app. | |
Obtains the access token. |
Example
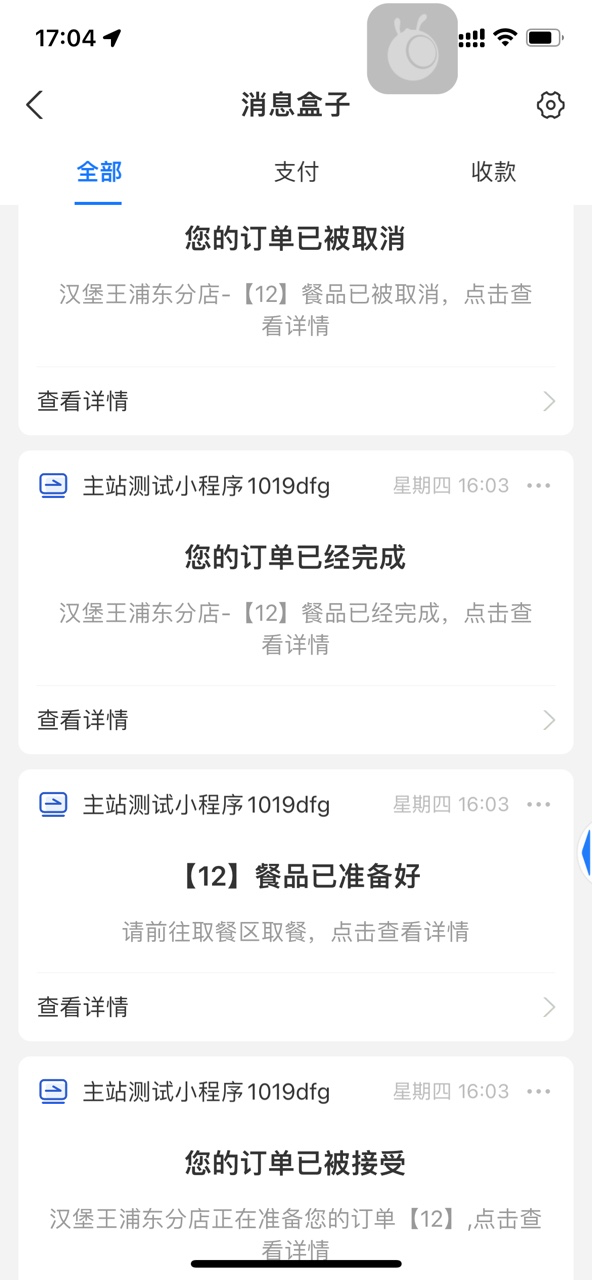
Check the sample inbox messages in the AlipayCN app below:
