Customize JSAPIs
After integrating IAPMiniProgram SDK into your app, the built-in JSAPIs are readily available for mini programs to call to achieve basic features. A list of these JSAPIs and their features can be found in JSAPI reference. Additionally, if you want to extend the functionality further, the SDK offers the ability to customize JSAPIs. With this ability, you can either create a new JSAPI or replace the default implementation of an existing built-in JSAPI. To add or override a JSAPI, follow the step-by-step instructions below.
Procedures
Step 1: Define the JSAPI
Define the customized JSAPI according to the following three steps.
1. Add a class
Create a new class that extends SimpleBridgeExtension with the following sample code:
public class TestBridgeExtension extends SimpleBridgeExtension {

}Note: For code readability and maintenance, it is recommended to create a new class for each JSAPI.
2. Add a method
Add a method inside the newly created class with the following sample code:
public class TestBridgeExtension extends SimpleBridgeExtension {

    @ActionFilter(canOverride = false)
    @ThreadType(ExecutorType.UI)
    public void testAPI(){

    }
}
When using the code above, you need to take the following actions depending on your special needs:
- Specify a method name and replace
testAPIwith it. The method name is the JSAPI name without themy.namespace. Depending on your specific needs, you can name the method in either of the following two ways:
- Use a name that is different from all the built-in JSAPIs, which creates a new JSAPI.
- Use the name of a built-in JSAPI, which allows you to override this JSAPI's default implementation.
- (Optional) Add annotations for this method if necessary. There are two annotations available:
ActionFilterandThreadType. Refer to the following table on how to specify values for them:
Annotation | Description | Valid values |
| The conditions to run the JSAPI. |
Default value is |
| The JSAPI running thread. |
Default value is |
3. Add parameters
Add parameters to the specified method with the following sample codes:
public class TestBridgeExtension extends SimpleBridgeExtension {

    @ActionFilter(canOverride = false)
    @ThreadType(ExecutorType.UI)
    public void testAPI(@BindingNode(Page.class) Page page,
                        @BindingParam(intDefault = 1) int intParam1,
                        @BindingParam(stringDefault = "ABC") String stringParam2,
                        @BindingCallback BridgeCallback bindingCallback){

    }
}
There are four types of parameters and corresponding annotations available. See Parameters for JSAPI definition for details. In the above sample code, four parameters are added to the testAPI method:
- page: An instance of the current page.
- intParam1: A business-related parameter whose data type is integer and default value is
1. - stringParam2: A business-related parameter whose data type is string and default value is
'ABC'. - bindingCallback: A callback parameter that returns a response to the mini program.
Step 2: Implement the JSAPI
Implement the defined JSAPI by setting the response to the mini program via the callback. You need to configure the response with either of the following methods:
JSONResponse: Call this method to return a customized response for either a success or failure callback. For detailed instructions, see Set response with JSONResponse.BridgeResponse: Call this method to return a built-in response for either a success or failure callback. For detailed instructions, see Set response with BridgeResponse.
Set responses with JSONResponse
Construct a result JSON object in the callback to return a response to mini programs. Refer to different sample codes for different responses:
- To send a success callback, construct the result object with the following sample code. Here, the response basically echoes back the input parameters.
public class TestBridgeExtension extends SimpleBridgeExtension {
    @ActionFilter(canOverride = false)
    @ThreadType(ExecutorType.UI)
    public void testAPI(@BindingNode(Page.class) Page page,
                        @BindingParam(name = "intParam1", intDefault = 1) int intParam1,
                        @BindingParam(name = "stringParam2", stringDefault = "ABC") String stringParam2,
                        @BindingCallback BridgeCallback bindingCallback){
        // Construct a result object
        JSONObject result = new JSONObject();
        result.put("param1", intParam1);
        result.put("param2", stringParam2);
        result.put("success", true);
        // Send the result back to the mini program
        bindingCallback.sendJSONResponse(result);
    }
}
- To send a failure callback, construct the result object with the error (the error code of the failed JSAPI call) and errorMessage (the error message of the failed JSAPI call) parameters as shown in the following sample code:
@ActionFilter
@ThreadType(ExecutorType.UI)
public void testAPI(@BindingApiContext ApiContext apiContext,
                 @BindingCallback BridgeCallback bridgeCallback) {
    JSONObject result = new JSONObject();
    result.put("error", errorCode);
    result.put("errorMessage", "Your error message");
    bridgeCallback.sendJSONResponse(result);
}
Set responses with BridgeResponse
To use built-in responses in your implementation, you need to build BridgeResponse.Error with the following sample code. For information about available built-in responses, refer to Built-in responses for BridgeResponse.
@ActionFilter
@ThreadType(ExecutorType.UI)
public void testAPI(@BindingApiContext ApiContext apiContext,
                 @BindingCallback BridgeCallback bridgeCallback) {
    bridgeCallback.sendBridgeResponse(BridgeResponse.UNKNOWN_ERROR);
}
Step 3: Register the JSAPI to SDK
Register the JSAPI to IAPMiniProgram SDK. Here, wrap up the created extension and the JSAPI with GriverBridgeManifest. In the manifest, specify the JSAPI with Arrays.asList by its name. Then, call the registerBridge API to register the JSAPI implementation to the SDK. See the following sample code for details:
Griver.registerBridge(new GriverBridgeManifest(TestBridgeExtension.class, Arrays.asList("testAPI")), new GriverContainerAPICallBack() {
       @Override
       public void error(int errorCode, String errorMessage) {
              showErrorToast(errorCode, errorMessage);
      }
});
Step 4: Register the JSAPI in Mini Program Platform
Register your customized JSAPIs in Mini Program Platform so that mini programs can access these JSAPIs. In your tenant workspace, only Workspace Admin can perform the following two steps to complete this action.
1. Register a new JSAPI
Complete the following three steps to register the new JSAPI:
- Log into Mini Program Platform and navigate to JSAPIs.
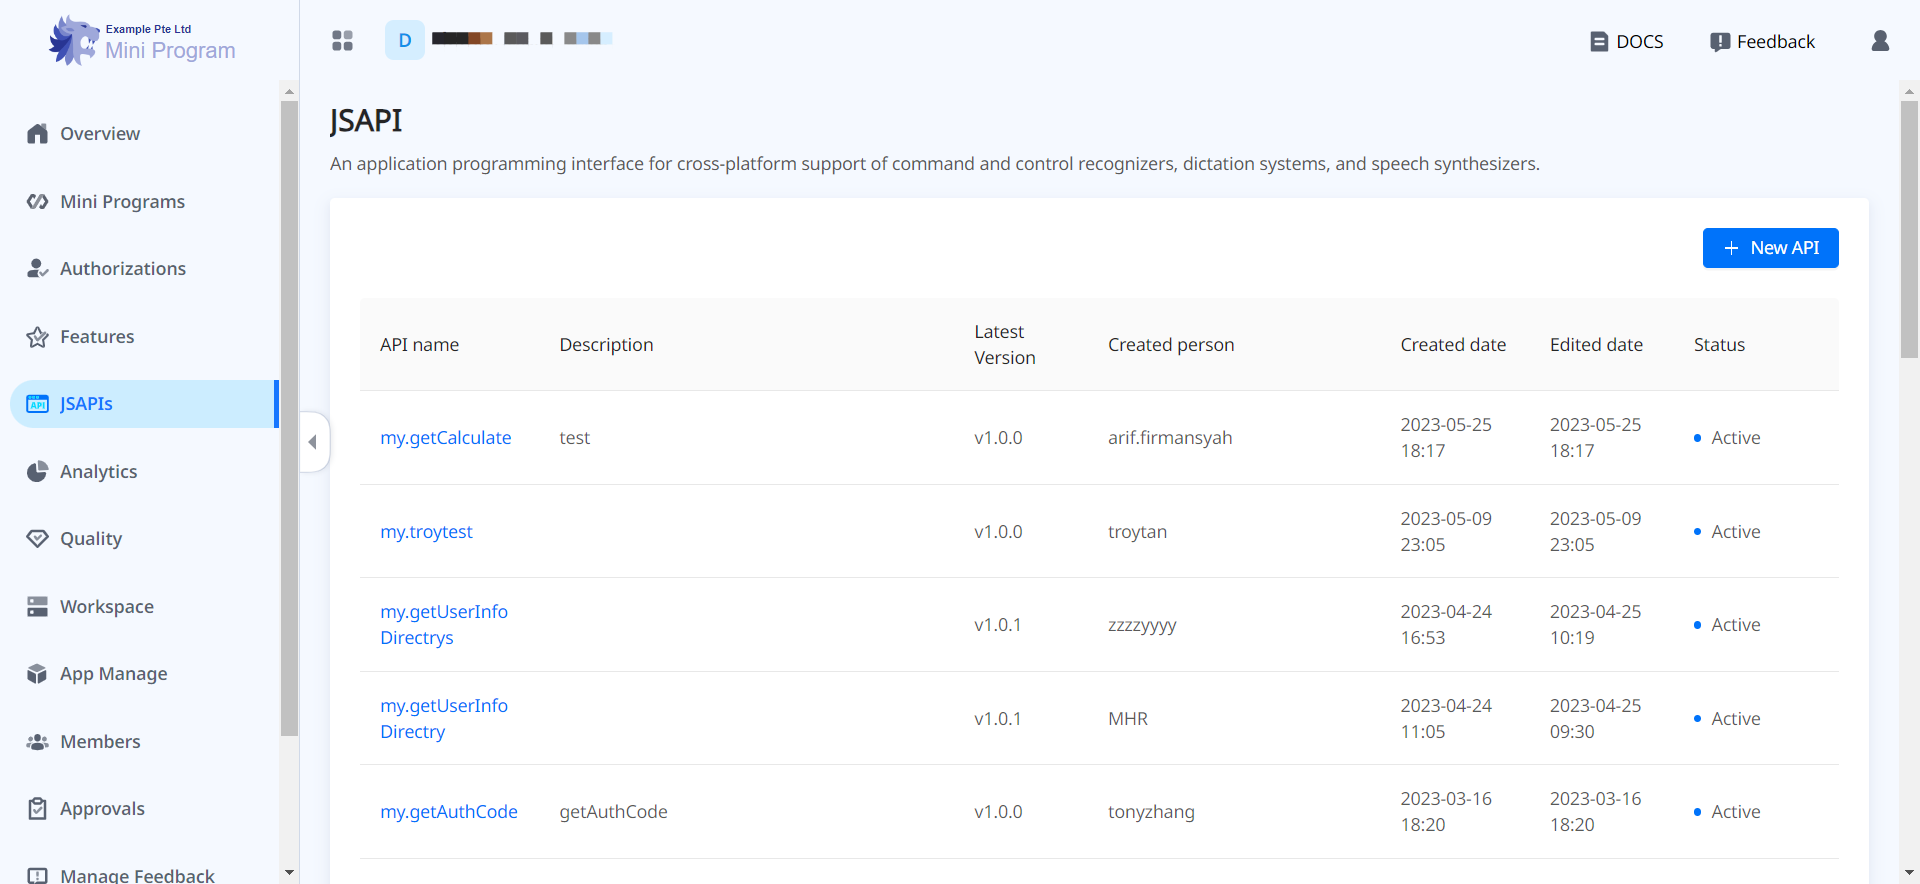
- Click + New JSAPI and fill out the required fields according to the embedded help and also the following instructions:
- JSAPI Name: Enter the same method name that you specify in step 1.2 Add a method. For example, in the above samples, the name is
testAPI. - App: Select the super apps that support this JSAPI.
- Click Confirm to finish the registration. Then, the added JSAPI appears in the JSAPI list.
2. Add the JSAPI to a feature
Then, add the JSAPI to a feature. A feature is basically a business functionality that is achieved by a set of JSAPIs. For example, for payment-related JSAPIs, you can add them to a feature named Payment. There are two scenarios you can expect when adding the JSAPI to a feature. Follow the steps that are appropriate to your specific scenario:
Add the JSAPI to a new feature
- In Mini Program Platform, navigate to Features and click + Add Feature.
- Fill out the details of the feature according to the embedded help and instructions below:
- Set the feature visibility: Switch the All mini programs can view this feature toggle button on if you want to make the feature visible to all mini programs both in your tenant workspace and associated developer workspaces. Otherwise, this feature is hidden unless you share it with any mini program after the creation. For more information about the feature sharing, refer to How to share a feature with target mini programs.
- Add the JSAPI: All the registered JSAPIs in the platform are listed in the left panel. Search and select the JSAPIs that are related to this particular feature and click the > sign to add them. Check the added JSAPIs that show up in the right panel and then click Confirm.
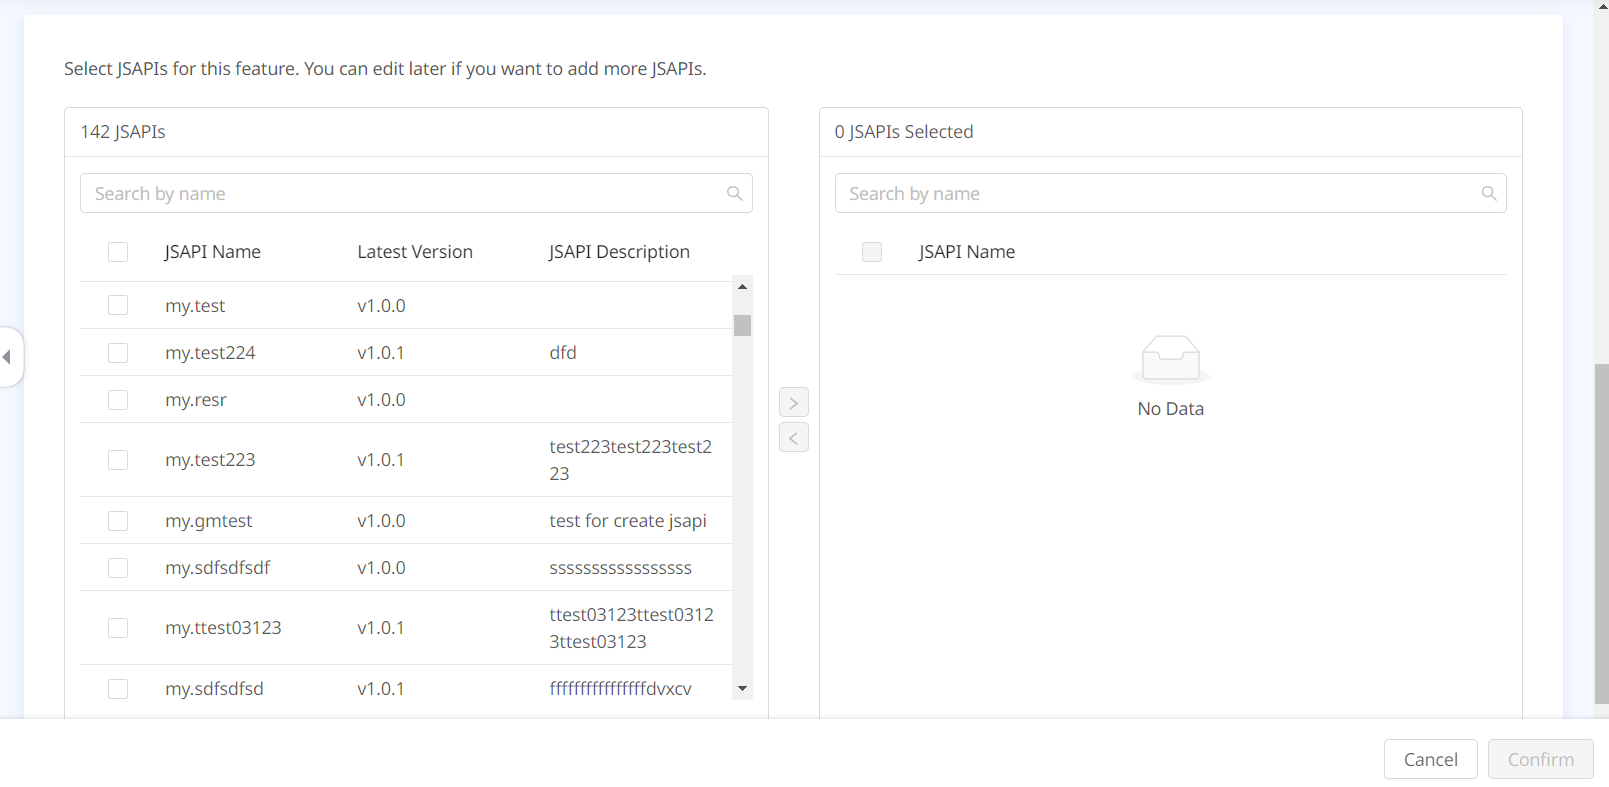
Add the JSAPI to an existing feature
- In Mini Program Platform, navigate to Features and find the existing feature to which you want to add the JSAPI.
- Click the feature name and click Edit on the next page.
- On the Edit Feature page, scroll down to the JSAPIs part directly. All the registered JSAPIs in the platform are listed in the left panel. Search and select the JSAPIs that are related to this particular feature and click the > sign to add them. Check the added JSAPIs that show up in the right panel and then click Save.
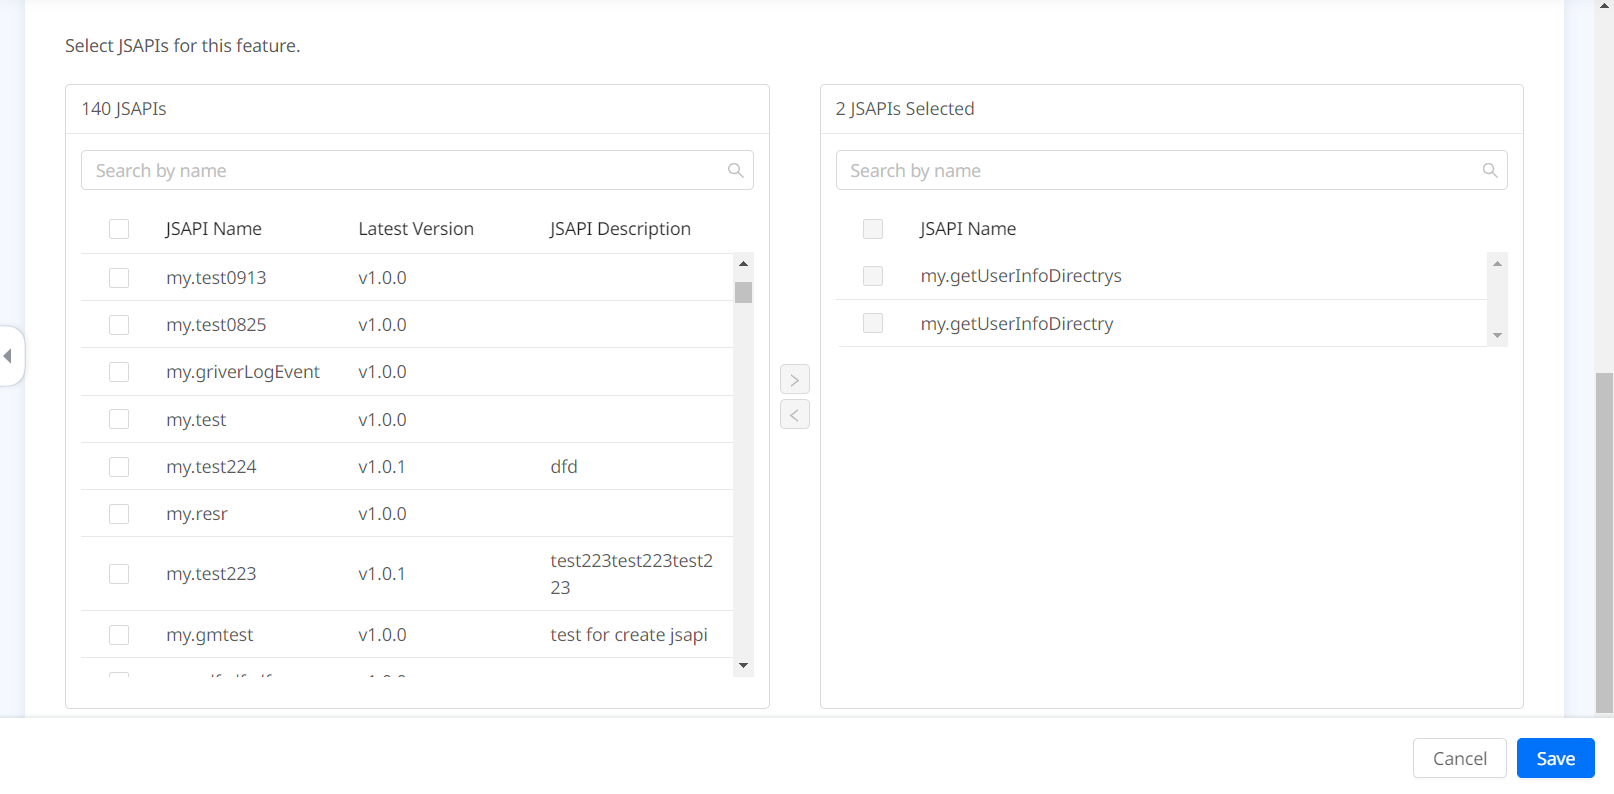
Appendices
Parameters for JSAPI definition
Parameter type and its description | Annotation | Valid values of the annotation |
Context: Includes the parameters that can obtain context-related information. |
|
|
Scope: The class that can be inherited by the request parameters. |
|
|
Business: Includes business-related parameters, whose data type needs to be any of the following:
|
|
|
Callback: Includes callback parameters. |
|
|
Built-in responses for BridgeResponse
Response | error | errorMessage | Description |
SUCCESS | N/A | N/A | The JSAPI call is successful. |
INVALID_PARAM |
|
| The mini program passes the parameters in an incorrect format or with invalid values. |
UNKNOWN_ERROR |
|
| An unknown exception. |
How to share a feature with target mini programs
For a mini program feature, when the All mini programs can view this feature toggle is switched off, Workspace Admin needs to set its visibility by selecting mini programs to share. Take the following steps to share a feature with target mini programs:
- In Mini Program Platform, navigate to Features and find the feature you want to share.
- Click the feature name to view the details, and click the Who will be able to view this tab.
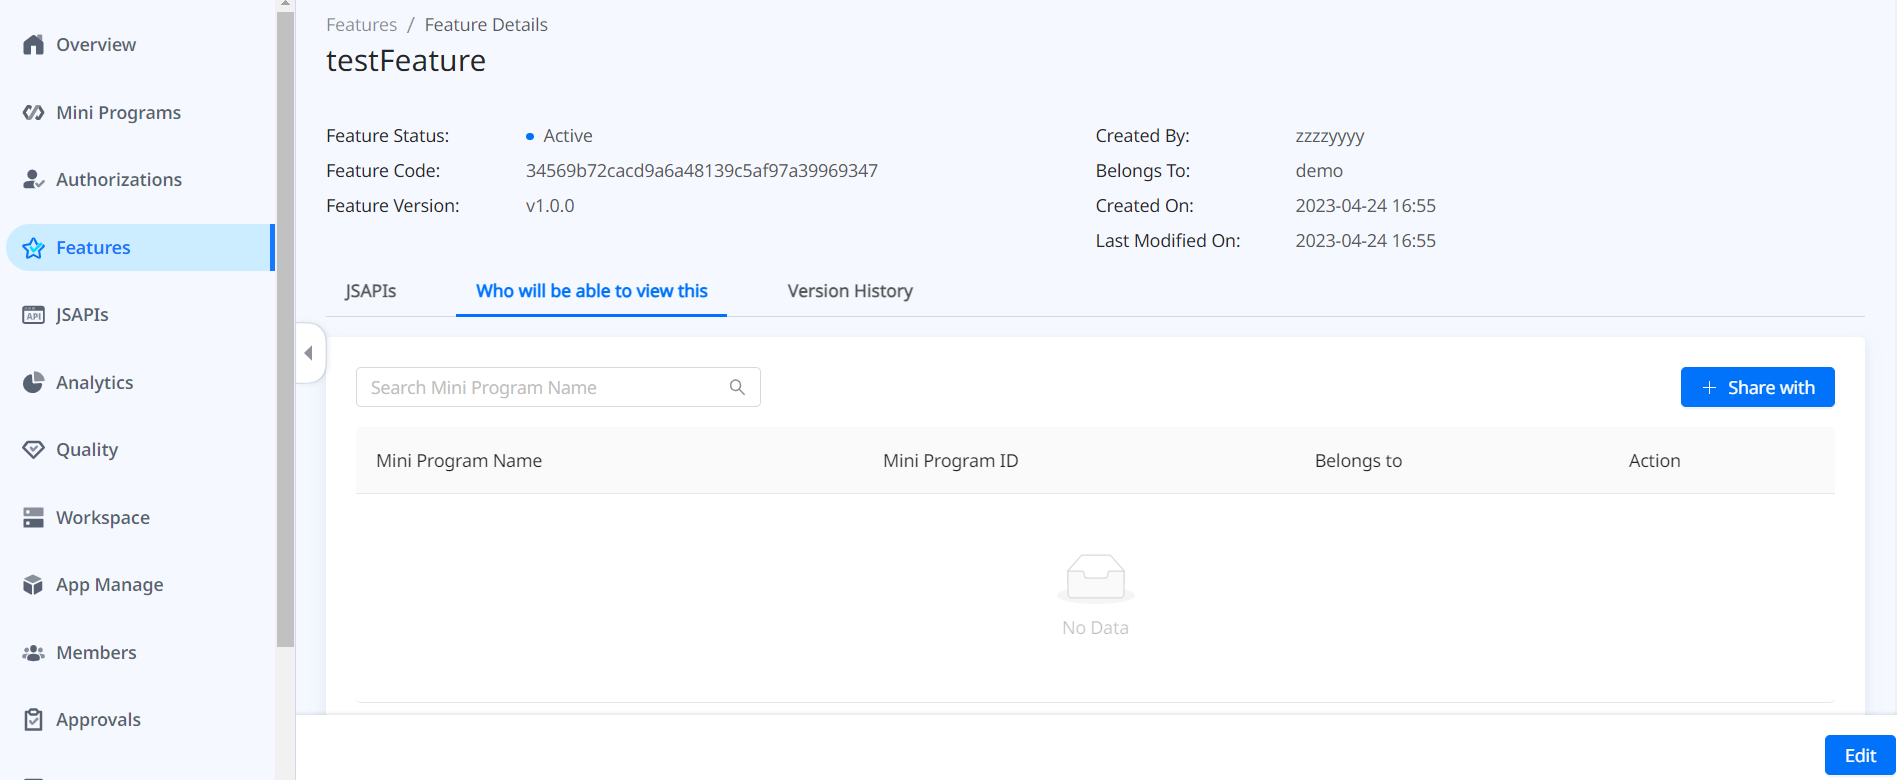
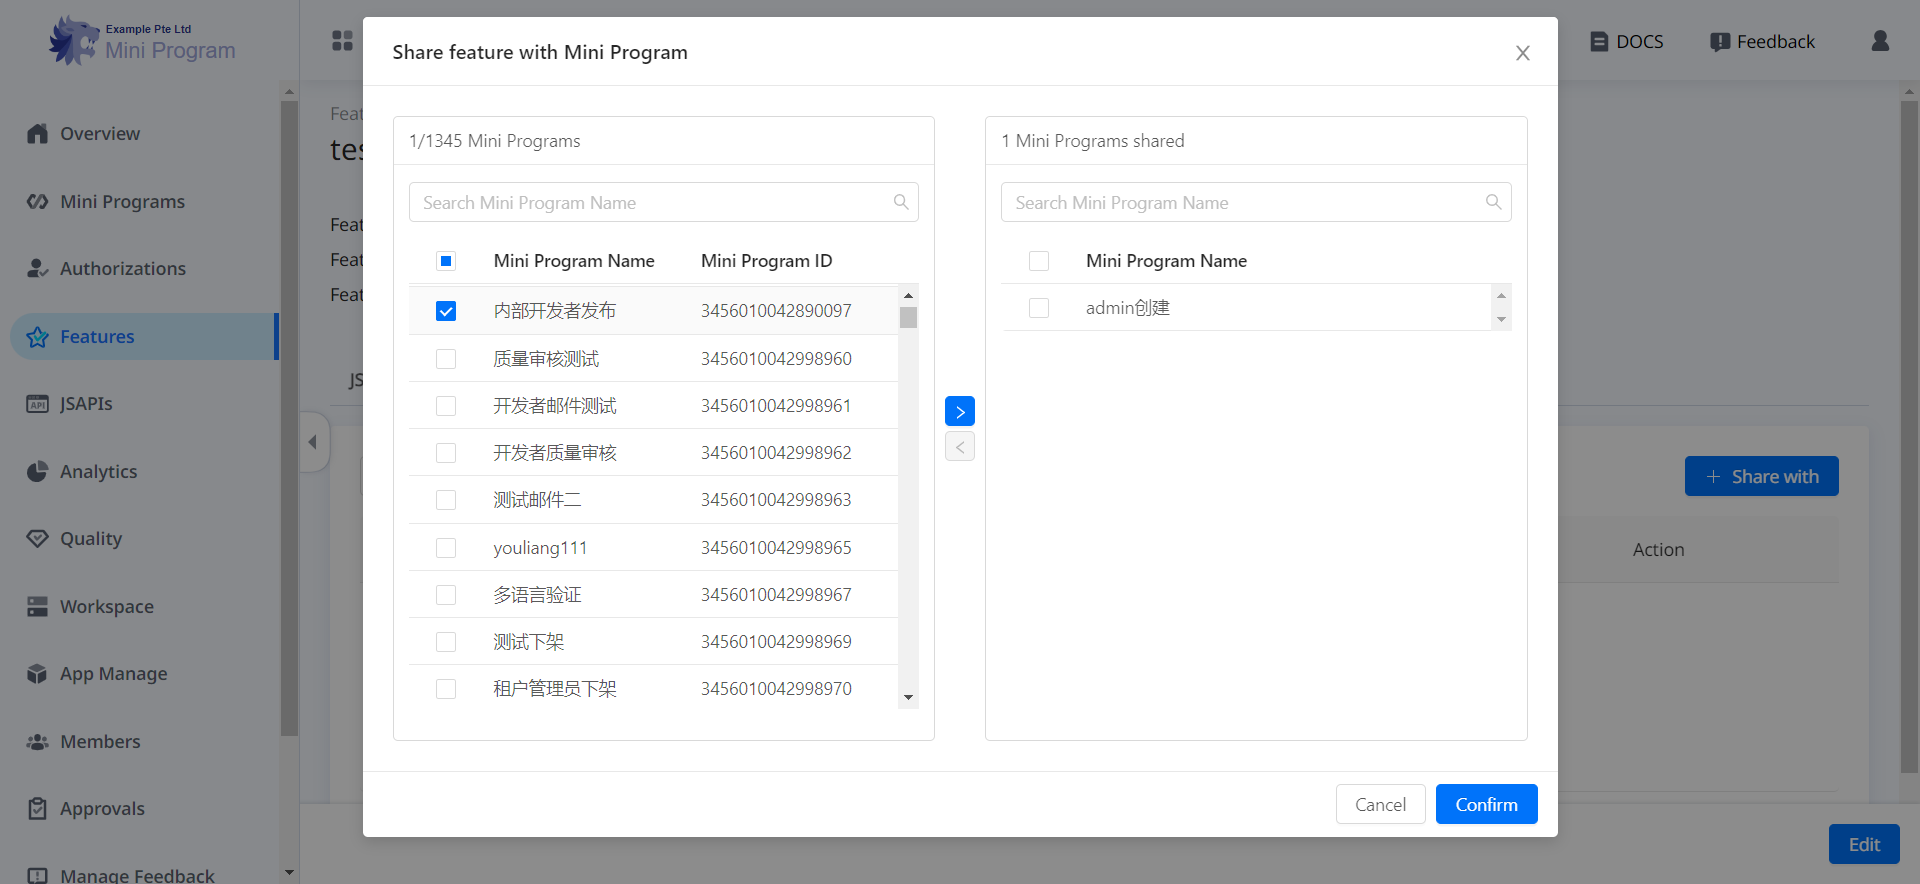
- Click + Share with to select mini programs to share. All mini programs from the tenant workspace and developer workspaces are listed in the left panel. Search and tick the target mini programs and click the > sign to add them. Check the added mini programs that show up in the right panel and then click Confirm.
Next steps
After customizing JSAPIs, super apps need to instruct mini program developers to utilize these JSAPIs. For more information, refer to Guide mini programs to call customized JSAPIs.