Customize JSAPIs
After integrating IAPMiniProgram SDK into your app, the built-in JSAPIs are readily available for mini programs to call to achieve basic features. A list of these JSAPIs and their features can be found in JSAPI reference. Additionally, if you want to extend the functionality further, the SDK offers the ability to customize JSAPIs. With this ability, you can either create a new JSAPI or replace the default implementation of an existing built-in JSAPI. To add or override a JSAPI, follow the step-by-step instructions below.
Procedures
Step 1: Define and Implement the JSAPI
Define and implement the JSAPI via the following three steps.
Add a new class
Create a new class that extends RVKJsApiHandler with XCode, which generates these two files: className.h and className.m.
Here, an example class named TestJsApiHandler is created, which generates the TestJsApiHandler.h andTestJsApiHandler.m files. The following sample code is from the former file:
#import <AriverKernel/AriverKernel.h>

NS_ASSUME_NONNULL_BEGIN

@interface TestJsApiHandler : RVKJsApiHandler

@end

NS_ASSUME_NONNULL_END
Override the implementation method
In the implementation file (which is theTestJsApiHandler.m file in our example), override the -handler:context:callback: method and provide business logic to handle the JSAPI call. Here is a sample code for overriding the implementation method:
#import "TestJsApiHandler.h"

@implementation TestJsApiHandler

- (void)handler:(NSDictionary *)data context:(RVKContext *)context callback:(RVKJsApiResponseCallbackBlock)callback {
    // process the input data
    // apply business logic
    NSMutableDictionary *result = [@{} mutableCopy];
    [result setValue:@"value1" forKey:@"result1"];
    [result setValue:@"value2" forKey:@"result2"];

    callback(result);
}

@end
For more information about the parameters in this method, refer to Parameters for the implementation method. To return responses to mini programs, construct a result object where you can specify the response parameter name with forKey and the parameter value with setValue. To return an error response, specify the error and errorMessage parameters with forKey.
Configure the JSAPI plist file
To configure the JSAPI plist file, add it to the project first. If a file already exists, configure it to record the information of JSAPI classes. In the plist file, add contents inside the <plist> tag with the following sample code:
<dict>
  <key>JsApiRuntime</key>
  <dict>
    <key>JsApis</key>
    <array>
      <dict>
        <key>name</key>
        <string>TestJsApiHandler</string>
        <key>jsApi</key>
        <string>testAPI</string>
      </dict>
        </array>
    </dict>
</dict>
In the JsApis array, each <dict> tag represents a single JSAPI. Inside the <dict> tag, set the name key with the name of the implemented class and define the JSAPI name with jsApi. This process establishes a one-to-one mapping between the class and the JSAPI, and this mapping is exclusive. In other words, each class is mapped to a unique JSAPI, and vice versa. When specifying the class name and JSAPI name, pay attention to the following things:
- For Swift classes (pure Swift class or inheriting NSObject), the actual class name is in the
PRODUCT_MODULE_NAME.fooBarformat, wherePRODUCT_MODULE_NAMEis the same as your target build setting. For example, ifTestJsApiHandleris written in Swift from theGriverDemoproject, then the value for thenamekey isGriverDemo.TestJsApiHandler. - Depending on your specific needs, you can define the JSAPI name in either of these two ways:
- Use a name that is different from all the built-in JSAPIs, which creates a new JSAPI.
- Use the name of a built-in JSAPI, which allows you to override this JSAPI's default implementation.
Step 2: Register the JSAPI to SDK
Register the plist file in your SDK configuration and initialize the SDK. See the following sample code for details:
GRVConfiguration *grvConfig = [[GRVConfiguration alloc] init];
grvConfig.plistFilePathForExtraPlugins = @"PATH_TO_YOUR_PLIST";
Step 3: Register the JSAPI in Mini Program Platform
Register your customized JSAPIs in Mini Program Platform so that mini programs can access these JSAPIs. In your tenant workspace, only Workspace Admin can perform the following two steps to complete this action.
Register a new JSAPI
Complete the following three steps to register the new JSAPI:
- Log into Mini Program Platform and navigate to JSAPIs.
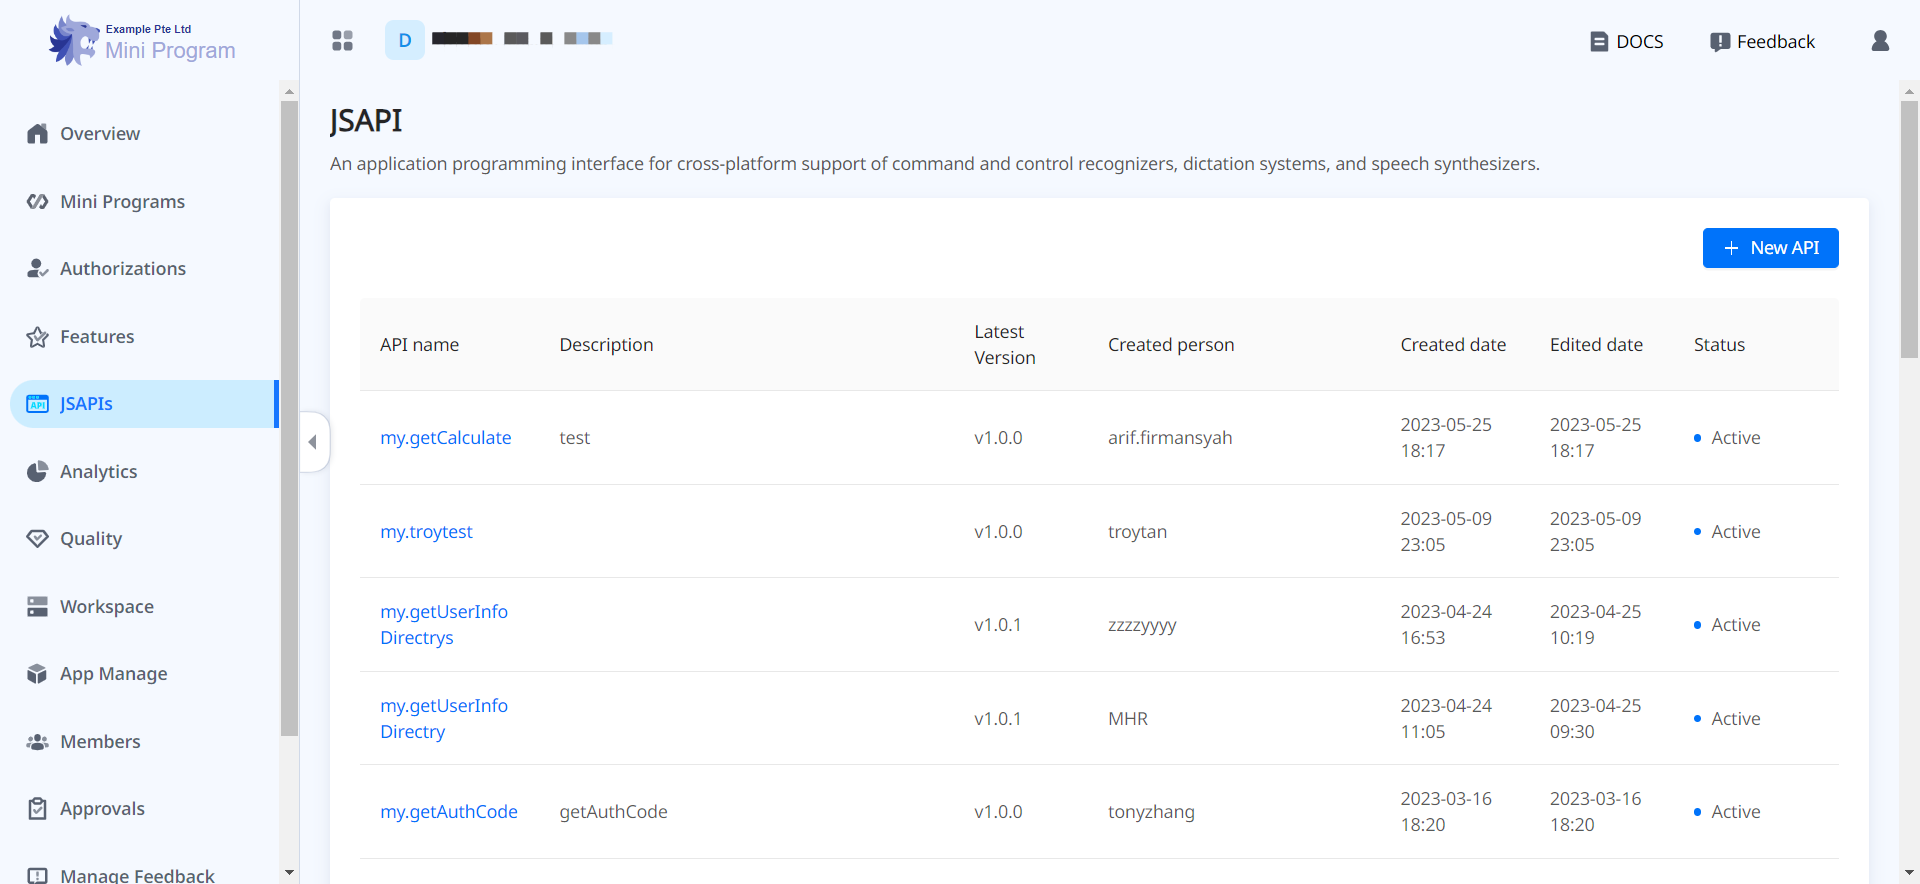
- Click + New JSAPI and fill out the required fields according to the embedded help and also the following instructions:
- JSAPI Name: Enter the same method name that you specify in step 1.3 Configure the JSAPI plist file. For example, in the above samples, the name is
testAPI. - App: Select the super apps that support this JSAPI.
- Click Confirm to finish the registration. Then, the added JSAPI appears in the JSAPI list.
Add the JSAPI to a feature
Then, add the JSAPI to a feature. A feature is basically a business functionality that is achieved by a set of JSAPIs. For example, for payment-related JSAPIs, you can add them to a feature named Payment. There are two scenarios you can expect when adding the JSAPI to a feature. Follow the steps that are appropriate to your specific scenario:
Add the JSAPI to a new feature
- In Mini Program Platform, navigate to Features and click + Add Feature.
- Fill out the details of the feature according to the embedded help and instructions below:
- Set the feature visibility: Switch the All mini programs can view this feature toggle button on if you want to make the feature visible to all mini programs both in your tenant workspace and associated developer workspaces. Otherwise, this feature is hidden unless you share it with any mini program after the creation. For more information about the feature sharing, refer to How to share a feature with target mini programs.
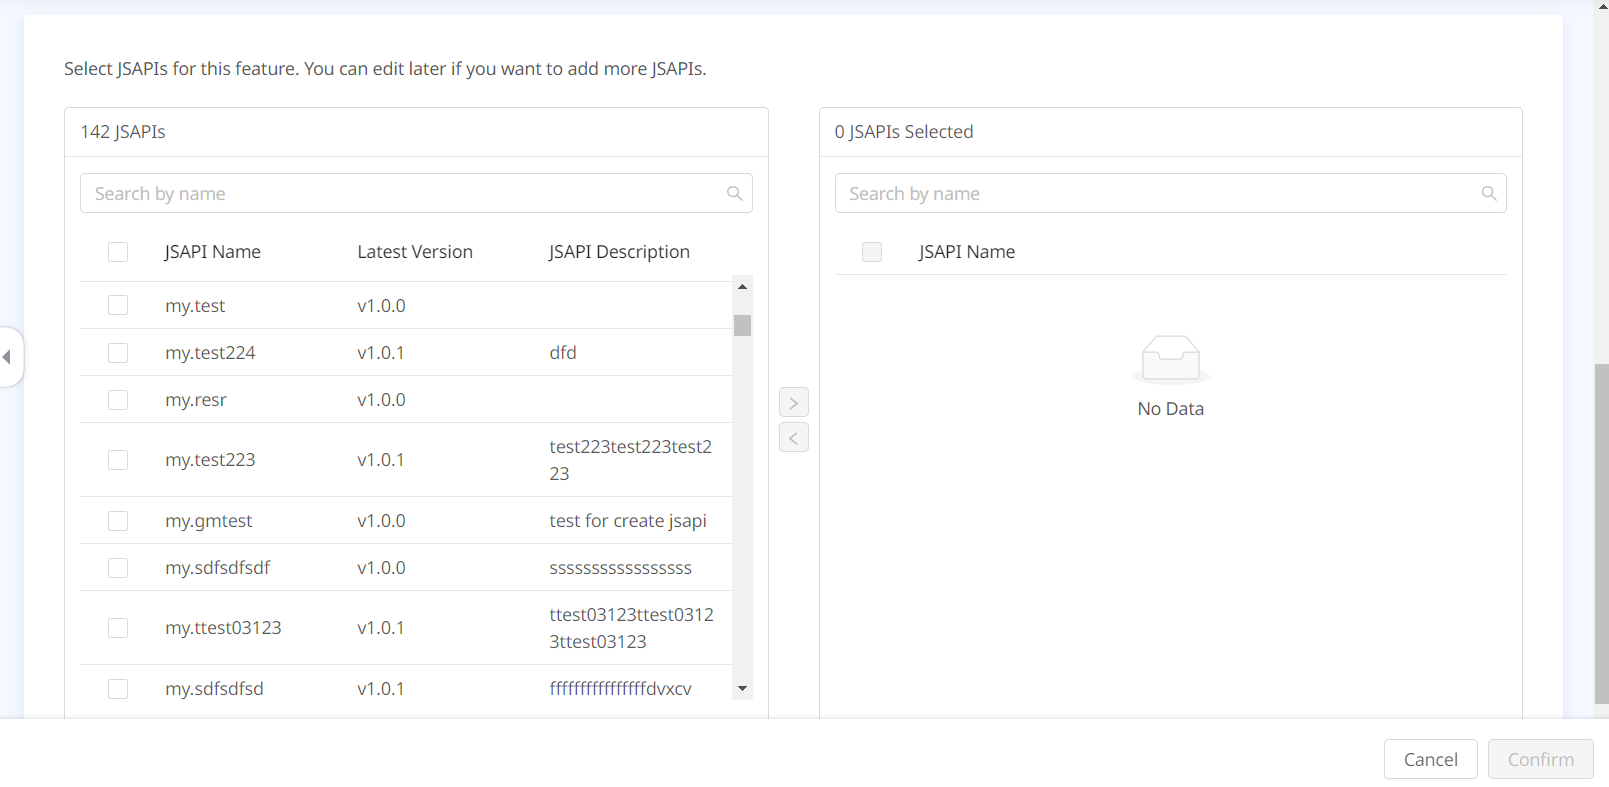
- Add the JSAPI: All the registered JSAPIs in the platform are listed in the left panel. Search and select the JSAPIs that are related to this particular feature and click the > sign to add them. Check the added JSAPIs that show up in the right panel and then click Confirm.
Add the JSAPI to an existing feature
- In Mini Program Platform, navigate to Features and find the existing feature to which you want to add the JSAPI.
- Click the feature name and click Edit on the next page.
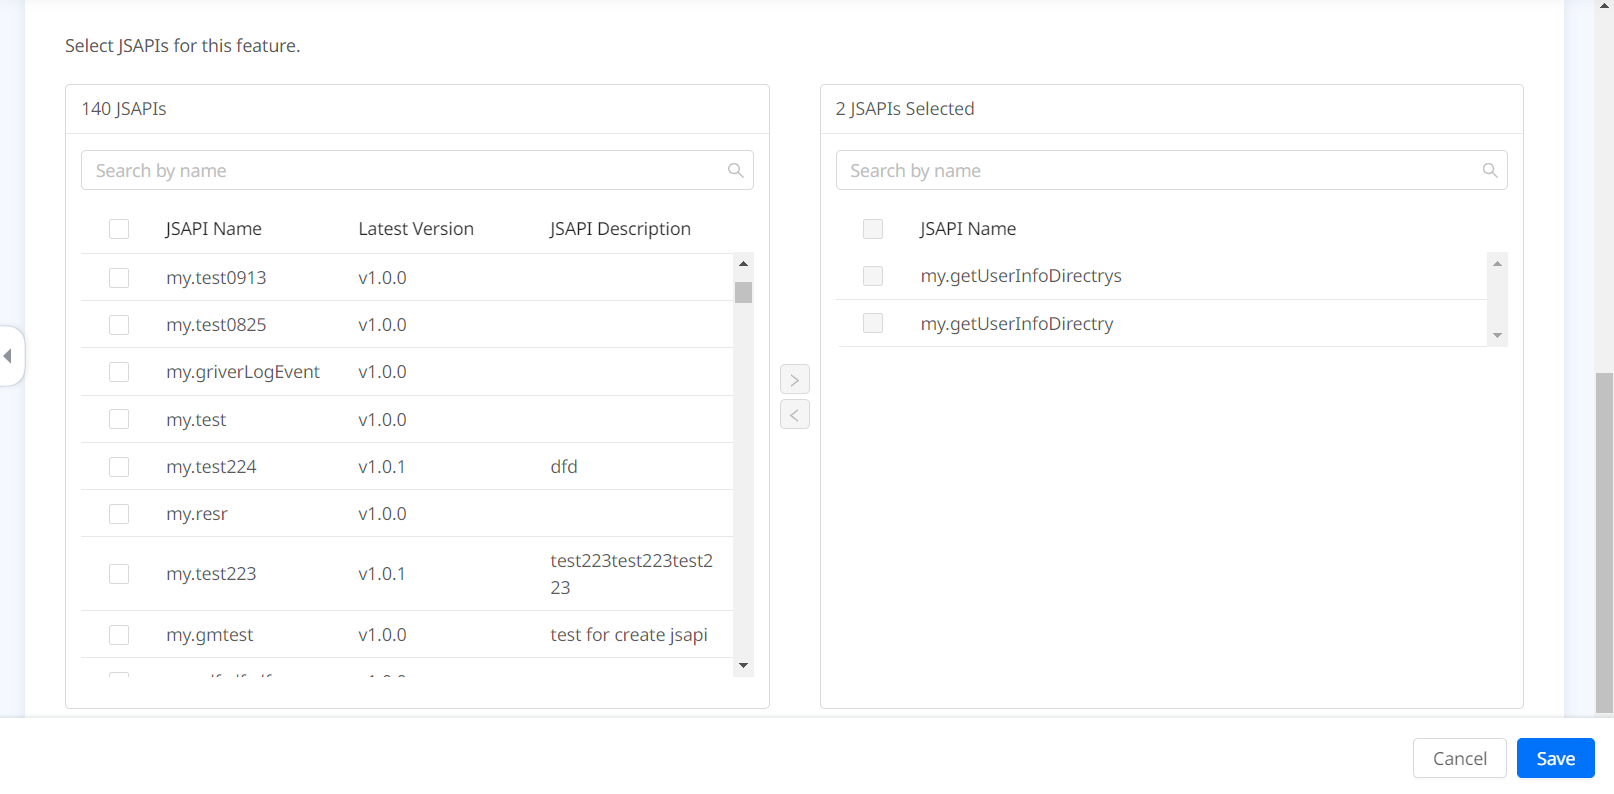
- On the Edit Feature page, scroll down to the JSAPIs part directly. All the registered JSAPIs in the platform are listed in the left panel. Search and select the JSAPIs that are related to this particular feature and click the > sign to add them. Check the added JSAPIs that show up in the right panel and then click Save.
Appendices
Parameters for the implementation method
Parameter type | Data type | Description |
data | NSDictionary | The request parameters of the JSAPI. Supported data types are:
|
context | RVKContext | The parameters to get information about the currently running mini program from the context, for example, the mini program running controller instance. |
callback | RVKJsApiResponseCallbackBlock | The callback method to return a response to the calling mini program. |
How to share a feature with target mini programs
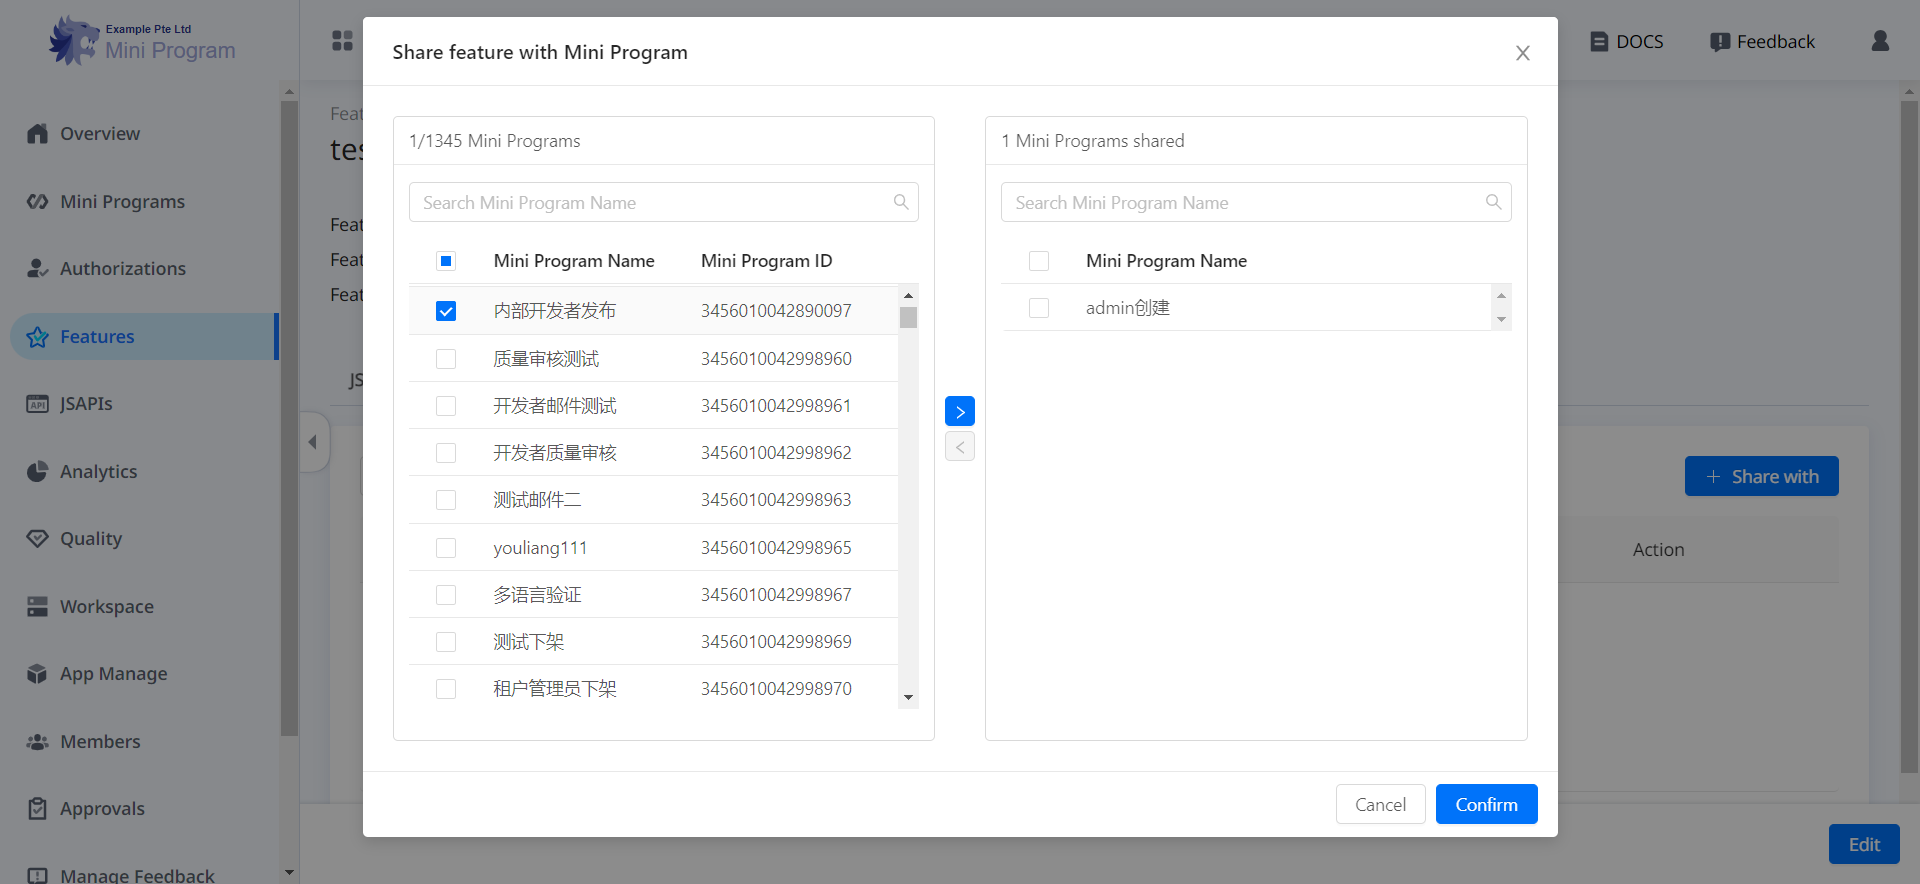
For a mini program feature, when the All mini programs can view this feature toggle is switched off, Workspace Admin needs to set its visibility by selecting mini programs to share. Take the following steps to share a feature with target mini programs:
- In Mini Program Platform, navigate to Features and find the feature you want to share.
- Click the feature name to view the details, and click the Who will be able to view this tab.
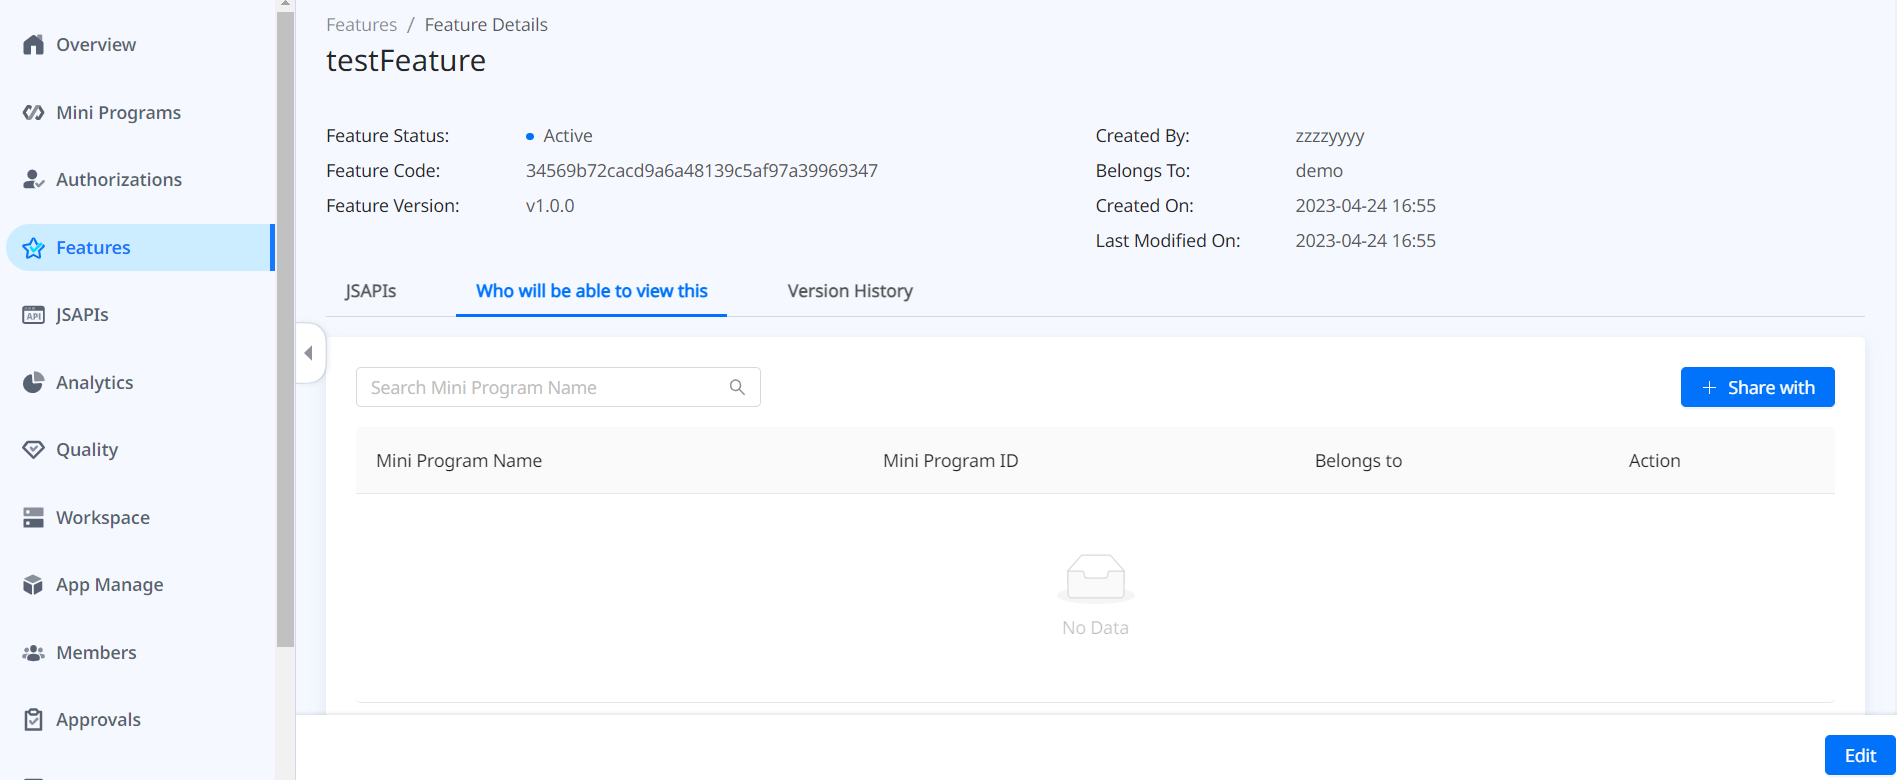
- Click + Share with to select mini programs to share. All mini programs from the tenant workspace and developer workspaces are listed in the left panel. Search and tick the target mini programs and click the > sign to add them. Check the added mini programs that show up in the right panel and then click Confirm.
Next steps
After customizing JSAPIs, super apps need to instruct mini program developers to utilize these JSAPIs. For more information, refer to Guide mini programs to call customized JSAPIs.